

How to Install Cable Supports
Intended for use by window installers only using Grip-Tite™ brand cable support systems.
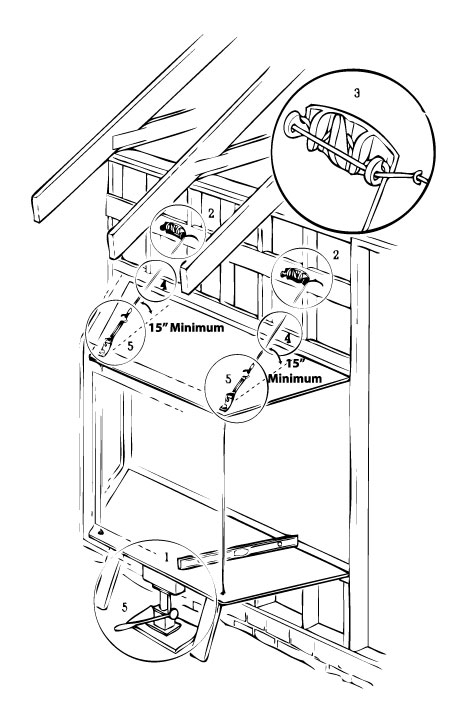
Steps- Use a jack and temporary support braces along with a level during initial installation of window unit. Window unit should be slightly raised above level position.
- Mount Grip-Tite™ cleats in appropriate position as shown with outside fingers pointing upwards.
- Wrap cable through first end finger of Grip-Tite™ cleat pulling cable tight; then weave cable through holes on top of Grip-Tite™ cleat and secure any excess cable over 12 inches with fence staple at any convenient location.
- Carefully place load on cable system to seat cables.
- WARNING! For upward adjustment never lift unit by tightening cable hex nut - always use jack and temporary braces to lift unit before adjusting coupler.
WARNING: Always use proper tools, safety equipment, and caution when installing window unit.
Disclaimer: Lang Exterior assumes no responsibility for providing installation instructions for any window. The Grip-Tite™ Line Art illustration shown is a recommendation only, not Lang Exterior's, and it is intended solely to aid each installer in an installation. Lang Exterior does not manufacture Grip-Tite™ product or create Grip-Tite™ Line Art nor does it assume any liability for personal injury, property damage, or repair costs for improper installation of any projection window or for providing this line art.
Join us on:
![]()
![]()
![]()
![]()
Copyright © 1953-2025, Lang Exterior, Inc, Chicago, IL. All rights reserved.
All subject to change without notice.
No part of this website, including artwork or text, may be reproduced or transferred to other websites, in whole or in part, in any form without written permission from Lang Exterior, Inc. (beyond that copying permitted by Sections 107 and 108 of the U.S. Copyright Law and except by reviewers for the public press).
Lang Exterior owns all rights or has license to such rights for its associated trademarks and copyrights of pictures on this website and company brochures. Lang Exterior does not authorize any customer or third party to use any of its associated trademarks, pictures or marketing information contained within this website and company brochures to mislead Lang Exterior current and potential customers as well as infringe on any such trademarks or copyrights described herein. Further, any customer or third party providing such trademarks, pictures, or information to mislead current or potential customers or infringing such trademarks and copyrights described herein will be liable under applicable law. If any legal fees occur the person committing the infringement will be responsible for all costs.
